This chapter describes the the basic Digital UNIX network environment, how to configure the Ethernet, Token Ring, and Fiber Distributed Data Interface (FDDI) network interfaces, and how to configure the the various network daemons in order to operate in a TCP/IP network environment. In addition, this chapter describes some of the commands to monitor the network environment.
For point-to-point connections, see Chapter 4.
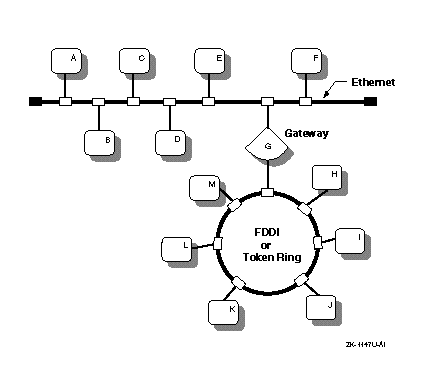
Figure 2-1 shows a sample corporate network in which there is an Ethernet backbone and FDDI network or Token Ring network connected to it through a gateway.
You configure the network components by using the Network Configuration application. Appendix A contains a worksheet that you can use to record the information that you need to configure the network components. If you are viewing this manual online, you can use the print feature to print a copy of this part of the worksheet.
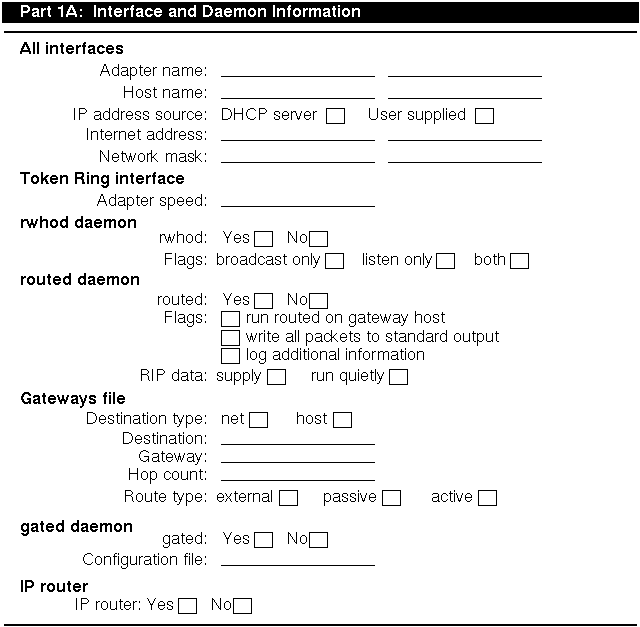
Figure 2-2 shows Part 1A of the Configuration Worksheet. The following sections explain the information you need to record in Part 1A of the worksheet.
If you are viewing this manual online, you can use the print feature to print a copy of this part of the worksheet.
| Interface | Device Name |
| Ethernet |
le
ln tu xna |
| Fiber Distributed Data Interface (FDDI) |
faa
fta fza |
| Token Ring | tra |
To obtain an Internet address for your network, contact:
Network Solutions Inc.
InterNIC Registration Service
505 Huntmar Park Drive
Herndon, VA 22070
Telephone numbers: (703) 742-4777
FAX: (703) 742-4811
E-mail: hostmaster@internic.net (for IP and domain registrations)
WWW: http://rs.internic.net/rs-internic.html
In Europe, you can contact:
RIPE Network Coordination Center
Kruislaan 409
NL-1098 SJ Amsterdam
The Netherlands
Telephone number: +31 20 592 5065
FAX: +31 20 592 5090
E-mail: ncc@ripe.net (for general information)
Hostmaster@ripe.net (for IP and domain registrations)
WWW: http://ripe.net
In Asia and the Pacific region, you can contact:
AP-NIC
c/o United Nations University
3-70 Jingumae 5-chome
Shibuya-ku
Shibuya-ku, Tokyo, 150, Japan
Telephone number: +81 3 5276 3973
FAX: +81 3 5276 6239
E-mail: hostmaster@apnic.net
WWW: http://www.apnic.net
Note
Digital recommends that you register your network with the NIC even if you do not intend to connect to the Internet network. Then, if you decide to connect to the Internet network later, you will not have to change all the host addresses on your network.
Use the following table to help identify your subnet mask. If you are not using subnetworks, the n is zero (0); otherwise, the n is greater than zero and less than or equal to 255.
| Class | IP Address Range | Subnet Mask |
| A | 0.0.0.0 to 127.0.0.0 | 255. n.n.n |
| B | 128.0.0.0 to 191.0.0.0 | 255.255. n.n |
| C | 192.0.0.0 to 223.0.0.0 | 255.255.255. n |
If you are connecting your system to an existing network that is using subnetwork routing, ask the network administrator for the correct subnet mask.
rwhod
daemon, check YES; otherwise, check NO.
Running the
rwhod
daemon allows you to use the
rwho
and
ruptime
commands.
rwhod
daemon is to send rwho packets and ignore incoming
packets, check BROADCAST ONLY. If the daemon is to collect incoming packets,
but not broadcast rwho packets, check LISTEN ONLY. If the daemon is to do
both, check BOTH.
Running the
routed
daemon allows your system's internal routing
tables for the Routing Information Protocol (RIP) to be updated automatically.
routed
daemon, check YES; otherwise, check NO.
Note
You can choose the
routeddaemon orgateddaemon, but not both.
routed
to run. You can run
routed
on a gateway host, write all packets to standard output,
or log debugging information. Check the options you want. See
routed(8)
for more information.
routed
is supply RIP information, check SUPPLY; otherwise, check RUN QUIETLY.
routed
that another routing process will install the route (it is not advertised
through RIP), check EXTERNAL.
Running the
gated
daemon allows your system's internal routing
tables for different routing protocols to be updated automatically.
gated
daemon, check YES; otherwise, check NO.
Note
You can choose the
routeddaemon orgateddaemon, but not both.
gated
uses the
/etc/gated.conf
file.
You can configure your system as an IP router if you have more than one network
interface installed and configured. In addition, you must have configured
either
routed
or
gated.
Figure 2-3 shows Part 1B of the Configuration Worksheet. The following sections explain the information you need to record in Part 1B of the worksheet. If you are viewing this manual online, you can use the print feature to print a copy of this part of the worksheet.

/etc/routes
file. A static route is not updated by network
software. If you want to a default gateway, check DEFAULT GATEWAY; to a host,
check HOST; or to a network, check NETWORK.
default.
/etc/hosts
file.
If your network is running a distributed database lookup service (BIND or NIS),
you do not need to list each host on your network in your
/etc/hosts
file. However, it is a good idea to list
four or five systems on the network designated as BIND or NIS servers in your
/etc/hosts
file.
/etc/hosts
file.
/etc/hosts
file.
/etc/hosts.equiv
file. Systems listed in the
/etc/hosts.equiv
file are logically equivalent to, and therefore treated exactly the
same as, the local system.
Setting up an
/etc/hosts.equiv
file is optional, but, if you
choose to have one on your system, you need to create it and add the names of
any trusted hosts.
/etc/networks
file.
Digital recommends that you use the Network Configuration application of the Common Desktop Environment (CDE) Application Manager for configuring network components on systems with graphics capabilities. You can configure the following components:
/etc/routes)
gated
daemon
routed
daemon
rwhod
daemon
hosts)
hosts.equiv)
/etc/networks)
See
netconfig(8X)
for more information on the Network Configuration application.
To invoke the Network Configuration application, log in as root, do the following:
To exit the Network Configuration application, choose File then Exit.
Note
For systems without graphics capabilities, you can use the
netsetuputility. Seenetsetup(8) for more information.
The Network Configuration application also has an extensive online help system. You can use it instead of the instructions in this section to configure network components on your system.
To configure the Ethernet, FDDI, or Token Ring network interface, do the following:
map-mbone(7)
for more information on multicast routing.
The Network Configuration application also enables you to modify and delete network interface. See the application online Help for additional information.
To configure the
rwhod
daemon, do the following:
rwhod
daemon the next time the system is rebooted.
rwhod
flag.
The Network Configuration application also enables you to modify and delete
the
rwhod
daemon. See the application online Help for additional information.
To configure the
routed
daemon, do the following:
routed
daemon the next time the system is rebooted.
routed
flags to the ON position as needed.
routed
is to run on a gateway host and supply Routing
Information Protocol (RIP) data. Set the Run Quietly radio button to the ON
position if
routed
is not to supply RIP information.
The Network Configuration application also enables you to modify and delete
the
routed
daemon and entries in the
gateways
file. See the application online Help for additional information.
See
routed(8)
and
gateways(4)
for more information.
To configure the
gated
daemon, do the following:
gated
daemon the next time the system is rebooted.
gated
configuration file in the Config File input text field.
Note
To configure the
gateddaemon, you must set up the/etc/gated.conffile in the format specified ingated.conf(4). A default/etc/gated.conffile is provided when you install the software.
The Network Configuration application also enables you to modify and delete
the
gated
daemon. See the application online Help for additional information.
See
gated(8)
and
gated.conf(4)
for more information.
In order to function as an IP router, your system must have two network
interfaces installed and configured and must have
routed
or
gated
configured. To configure the system as an IP router, do the following:
The Network Configuration application also enables you to deconfigure the system as an IP router. See the application online Help for additional information.
To configure the
routes
file, you add entries (static routes), to the
routes
file. Do the following:
The Network Configuration application also enables you to modify and delete
entries in the
routes
file. See the application online Help for additional information.
See
routes(4)
for more information.
To configure the
hosts
file, do the following:
hosts
file and close the Hosts dialog box.
The Network Configuration application also enables you to modify and delete
entries in the
hosts
file. See the application online Help for additional information.
See
hosts(4)
for more information.
To configure the
hosts.equiv
file, do the following:
Note
If the host is not on the network, you cannot add the host.
/etc/hosts.equiv
file and close the Hosts.equiv dialog box.
The Network Configuration application also enables you to modify and delete
entries in the
hosts.equiv
file. See the application online Help for additional information.
See
hosts.equiv(4)
for more information.
To configure the
networks
file, do the following:
/etc/networks
file and close the Networks dialog box.
The Network Configuration application also enables you to modify and delete
entries in the
networks
file. See the application online Help for additional information.
See
networks(4)
for more information.
Interface access filtering provides a mechanism for detecting and preventing IP spoofing attacks. To enable interface access filtering on an interface, do the following:
/etc/ifaccess.conf
file and add entries against which the source address of input packets are
checked.
ifconfig
command with the
+filter
parameter to enable access filtering on the network interface.
See
ifaccess.conf(4)
and
ifconfig(8)
for more information.
You use the
netstat
command to monitor the status of the local
host by viewing the contents of network-related data structures. You can select
several forms of display; each allows you to specify the type of information
you want to emphasize.
To monitor the local host's network status, use the
netstat
command with the following syntax:
netstat
[
options...
]
Table 2-1
shows the
netstat
command options.
| Option | Function |
-A
|
Displays the address of any associated protocol control blocks. |
-a
|
Includes information for all sockets. |
-f
|
Includes statistics or address control block reports for the specified address family. |
-I
|
Displays information about the specified interface only. |
-i
|
Provides status information for autoconfigured interfaces. |
-m
|
Displays information about memory management usage. |
-n
|
Lists network addresses in number form rather than symbolic form. |
-r
|
Lists routing tables. |
-s
|
Provides statistics per protocol. |
-t
|
Displays the time until the interface watchdog
routine starts (for use with the
-i
option).
|
The
-I
option provides statistics for a specific interface. See
Appendix B
for an example of using the
-I
option to monitor Ethernet, Fiber Distributed Data Interface (FDDI), and token
ring interfaces, and a description of the counters, status, and
characteristics. The
-i
option gives statistics on each configured network interface. Outgoing packet
errors
(Oerrs)
indicate a potential problem with the local host. Incoming errors
(Ierrs)
indicate a potential problem with the network connected to the interface.
See
netstat(1)
for more information on this command.
The following example shows normal output (no
Ierrs
or
Oerrs)
from the
netstat
command with the
-i
option:
%
netstat -i
Name  Mtu   Network   Address       Ipkts Ierrs    Opkts Oerrs  Coll
ln0   1500  <Link>                8324125     0  8347463     0 237706
ln0   1500  16.31.16  host1       8324125     0  8347463     0 237706
fza0* 4352  <Link>                      0     0        0     0    0
sl0*  296   <Link>                      0     0        0     0    0
sl1*  296   <Link>                      0     0        0     0    0
tra0  4092  <Link>                     34     0       20     0    0
tra0  4092  16.40.15  host21           34     0       20     0    0
lo0   1536  <Link>                 909234     0   909234     0    0
lo0   1536  loop      localhost    909234     0   909234     0    0
You use the
fddi_config
command to display and modify the FDDI adapter parameters.
To display the FDDI adapter parameters, use the
fddi_config
command with the following syntax:
fddi_config
-i interface_name -d
To modify the FDDI adapter parameters, do the following:
fddi_config
command and options as follows:
fddi_config [
options...
]
Table 2-2
shows the
fddi_config
command options.
| Option | Function |
|
Changes or displays the FDDI characteristics for
interface_name.
You must provide the interface name.
|
|
Determines how often the driver counters are updated by the DEFTA adapter. The default is 1 second. Setting the interval time to zero (0) disables counter updates. (For the DEFTA (fta) FDDI interface only.)) |
-d
|
Displays the FDDI interface parameters you can set. |
|
Sets the error rate threshold of Link Error Monitor (LEM). The LEM error rate
threshold is
1×10^-n,
where
n
ranges from 5 to 8, inclusively. The default LEM threshold is
1×10^-8.
|
-p [1|0]
|
Sets the ring purger state for the specified FDDI interface. A value of 1 enables the ring purger ability; a value of 0 disables it. |
|
Sets the Restricted Token Timeout parameter, defining how long a single restricted mode dialog can last before being terminated. The range for this parameter is from 0 to 10000 milliseconds. The default value is 1000 milliseconds. |
|
Sets the Request Token Rotation Time (T_req)
for
interface_name.
T_req is used during the ring initialization process to negotiate a Target
Token Rotation Time (TTRT) for the ring. The range for this parameter is from
4.0 milliseconds to 167.77208 milliseconds. The default value is 8.0
milliseconds.
|
|
Sets the Valid Transmission Time (TVX) timer for a specific FDDI interface. The range for the TVX timer is from 2.35 milliseconds to 5.2224 milliseconds. The default is 2.6214 milliseconds. |
-x [1|0]
|
Enables (1) or disables (0) full-duplex operation for the interface. If the full-duplex operation is enabled, the interface can be in one of the following states: Idle, Request, Confirm, or Operational. (For the DEFTA (fta) FDDI interface only.) |
See
fddi_config(1)
for more information on this command.
The following example shows how to display the FDDI interface parameters you can set:
%
/usr/sbin/fddi_config -i fza0 -d
fza0 ANSI FDDI settable parameters
Token Request Time:                0.0000 ms
Valid Transmission Time:           0.0000 ms
LEM Threshold:                     0
Restricted Token Timeout:          15.8314 ms
Ring Purger State:                 (null)
fza0 Full Duplex Mode: Disabled
fza0 Counter Update Interval: 10 sec
The following example shows how to change the Token Request Time (TRT) value for the fza0 interface to 10.2:
#
fddi_config -t10.2 -i fza0
The following example shows how to turn the ring purger off:
#
fddi_config -p 0 -i mfa0
Source routing is a bridging mechanism that systems on a token ring LAN use to send messages to a system on another interconnected token ring LAN. Under this mechanism, the system that is the source of a message uses a route discovery process to determine the optimum route over token ring LANs and bridges to a destination system. The source system stores the optimum routes in its source routing table.
When the system is booted with the DETRA adapter installed and configured,
token ring source routing is initialized by default. To manage token
ring source routing, use the
srconfig
command and options as follows:
srconfig options...
Table 2-3
shows the
srconfig
command options. All
srconfig
command options are case insensitive; type them in uppercase, lowercase, or
mixed case. The short form for each flag is indicated by uppercase letters.
| Option | Function |
|
Deletes a source routing table entry. |
|
Disables a source routing table entry. This marks the entry as Stale. |
-RAttr
|
Displays the source routing attributes. |
-RCounter
|
Displays the source routing counters. |
|
Displays a specific source routing table entry. |
-RTable
|
Displays the source routing table. |
|
Sets the value of the Source Routing Aging Timer, specifying the length of time a source routing table entry remains valid until being marked as invalid or Stale. If not set, the system default is 120 seconds. |
|
Sets the Source Routing Discovery Timer, specifying the amount of time a route discovery process can take before it terminates. If not set, the system default is 5 seconds. |
|
Sets the maximum number of entries allowed in the source routing table. The range for this entry is a multiple of 256 from 1024 to 2048. This parameter can be increased, but not decreased. If not set, the system default is 1024. |
-u
|
Specifies that the MAC addresses are in
uncanonical form. This option can be used with the
-DElEntry mac_address,
-DISEntry mac_address,
and
-RTable
options only.
|
-Zcounter
|
Sets the source routing counters to zero. |
Table notes:
See
srconfig(8)
for more information on this command.
The following example increases the number of routing table entries
from 1024 to 1280 by using the shortened form of the
-SetMaxEntry
option:
#
srconfig -setm 1280
Current SR Table size is : 1024
New SR Table size is : 1280
The following example displays the source routing attributes by using the
shortened form the the
-RAttr
option:
#
srconfig -ra
Source Routing is enabled
Current SR Aging Timer     : 120
Current SR Discovery Timer : 10
Current SR Table size is   : 1024
The following example displays the source routing counters by using the
shortened form of the
-RCounter
option:
#
srconfig -rc
ARE Frames Sent          : 00000001
ARE Frames received      : 00000000
Route Discovery Failures : 00000001
The following example displays all entries, with MAC addresses in canonical
form, in the source routing table, by using the shortened form of the
-RTable
option. The backslash (\) character is included for formatting purposes
and does not appear in the actual output.
#
srconfig -rt
Target Node MAC Address 00-00-0C-01-08-E9 (ip = 130.180.4.3) \
Have Route  [1]
Routing Information: SRF, length 8, direction 0,largest frame \
4472 octets  [2]
Route Descriptors: 021C 7FFC 0220 0000 0000 0000 0000 0000    [3]


Target Node MAC Address 00-00-C9-10-1B-F5 On Ring    [4]


Target Node MAC Address 08-00-2B-2C-F1-F9 (ip = 130.180.4.2)  \
Stale (Have Route)   [5]
Routing Information: SRF, length 8, direction 0,largest frame 4472 octets
Route Descriptors: 021C 7FFC 0220 0000 0000 0000 0000 0000


Target Node MAC Address 00-00-C9-0B-33-80 Stale (On Ring)
HaveRoute
indicates the source system has a valid path to the destination system.
[Return to example]
OnRing
indicates the destination system is on the same ring
as the source system and does not need source routing.
[Return to example]
Stale
indicates the entry is invalid and
needs to be updated by the route discovery process.
[Return to example]
The following example displays all entries, with MAC addresses in noncanonical
form, in the source routing table by using the shortened form of the
-RTable
option. The backslash (\) character is included for formatting purposes
and does not appear in the actual output.
#
srconfig -rt -u
Target Node MAC Address 00:00:30:80:10:97 (ip = 130.180.4.3) Have Route
Routing Information: SRF, length 8, direction 0,largest frame 4472 octets
Route Descriptors: 021C 7FFC 0220 0000 0000 0000 0000 0000


Target Node MAC Address 00:00:93:08:D8:AF On Ring


Target Node MAC Address 10:00:D4:34:8F:9F (ip = 130.180.4.2) Stale \
 (Have Route)
Routing Information: SRF, length 8, direction 0,largest frame 4472 octets
Route Descriptors: 021C 7FFC 0220 0000 0000 0000 0000 0000


Target Node MAC Address 00:00:93:D0:CC:01 Stale (On Ring)
By default, the DETRA adapter uses an IP maximum transfer unit (MTU) size of 4092 bytes. In a multivendor environment with different adapters using different IP MTU sizes, the bridges connecting different networks can be set up to forward smaller packet sizes. As a result, bridges might drop packets or remote hosts might reject packets. If either occurs on your network, reduce the IP MTU size for all hosts on the network and ensure that all hosts use the same size.
The following command displays the DETRA interface IP MTU size as 4092 bytes:
%
ifconfig tra0
tra0: flags=9863<UP,BROADCAST,NOTRAILERS,RUNNING>
     inet 16.141.208.3 netmask ffffff00 broadcast 16.141.208.255 ipmtu 4092
The following command changes the IP MTU size of DETRA interface to 2044 bytes:
%
ifconfig tra0 ipmtu 2044